How to Set Up Automated Rent Payments in the UAE
Step-by-step UAE guide to set up automated AED rent payments: lease checks, tenant authorisation, Rewa setup and reconciliation.
How to Set Up Automated Rent Payments in the UAE
I’d set up automated rent payments in the UAE in 3 steps: agree the terms, authorise payments and check settlement. Before the first collection, I’d confirm the rent in AED, get the tenant’s written consent and arrange the return or cancellation of any cheques covering the same rent.
My checklist would cover:
- Lease and consent: Record changes in a signed addendum and check whether the tenancy record needs updating.
- Rewa setup: Confirm card or bank support, fees and settlement terms, then complete onboarding and payment authorisation.
- Payment checks: Track the first collection, match receipts to bank records and agree how to handle failed payments, changes and cancellations.
My rule: <u>rent is settled when funds reach the agreed account</u> - not just when a payment is authorised. I’d review that record after every rent cycle.
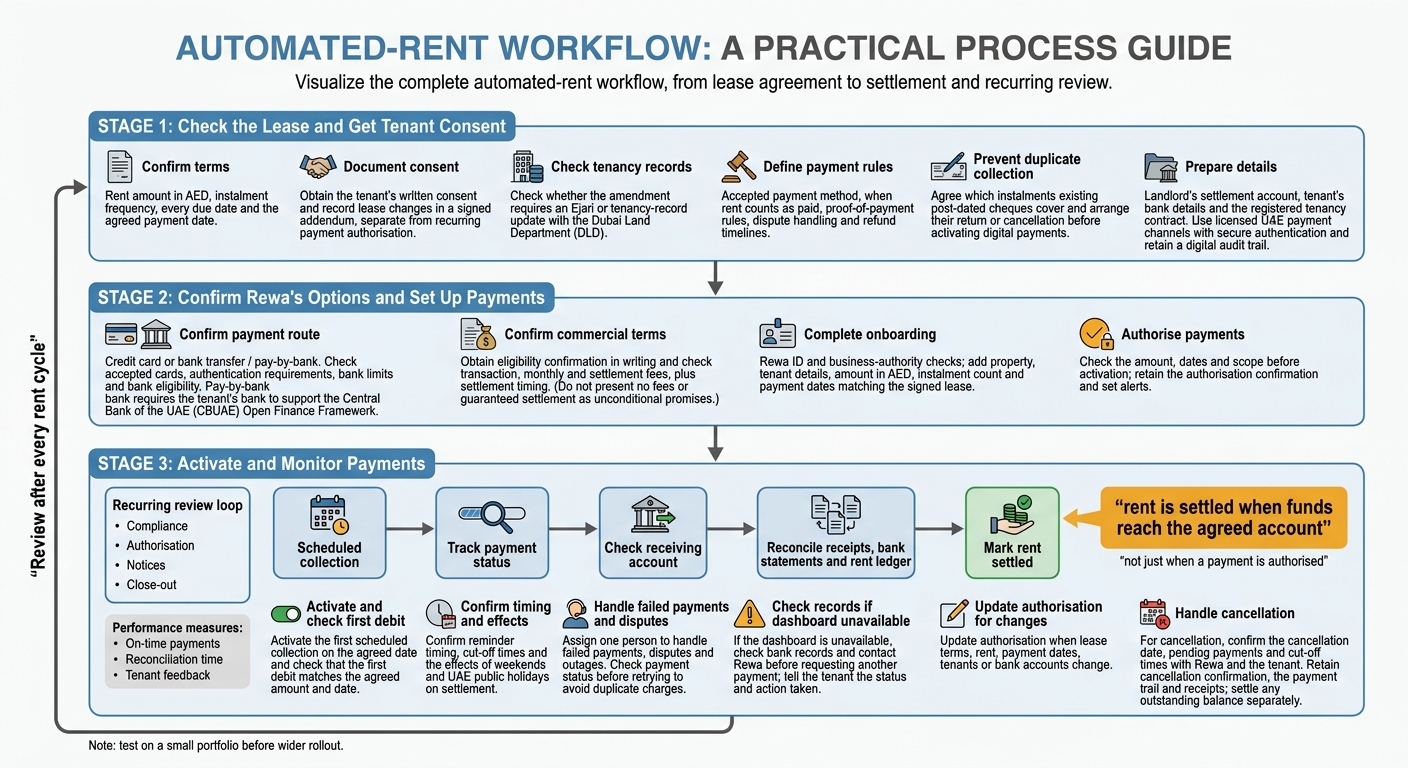
Automated Rent Payments in the UAE: Setup to Settlement
Step 1: Check the Lease and Get Tenant Consent
Before changing the payment method, check whether the lease amendment requires an Ejari or tenancy-record update with the Dubai Land Department (DLD).
Confirm Rent, Due Dates and Payment Terms
Check the rent amount in AED, the instalment frequency and every due date. Agree on the payment date before switching from post-dated cheques to digital payments.
Record any lease change in a signed addendum, separate from the recurring payment authorisation. Include the accepted payment method, when rent counts as paid, proof-of-payment rules, how disputes will be handled and refund timelines.
If post-dated cheques are already in use, agree which instalments they cover and how they’ll be returned or voided before activating digital payments. Make sure the same rent isn’t collected twice.
Prepare Identity and Bank Details
Have the landlord’s settlement account details and the tenant’s bank details ready. Match each payment to the registered tenancy contract.
Use licensed UAE payment channels with secure authentication and a digital audit trail. Keep the authorisation and transaction history with the tenancy record.
sbb-itb-80e96b1
Step 2: Confirm Rewa’s Options and Set Up Payments
With the lease terms and consent in place, align Rewa’s payment setup with the agreement.
Rewa supports rent payments by credit card and bank transfer, and offers reward points to tenants. It also automates collection and guarantees on-time landlord settlement with no fees. Before enrolment, confirm eligibility in writing and check the contract for any transaction, monthly or settlement fees.
Check Card and Bank-Transfer Requirements
Check which payment route works with the tenant’s bank or card. Rewa’s pay-by-bank option requires the tenant’s bank to support the Central Bank of the UAE (CBUAE) Open Finance Framework. Confirm bank limits and authentication steps before setup.
| Requirement | Credit card | Bank transfer / pay-by-bank |
|---|---|---|
| Authorisation | Confirm accepted cards and authentication requirements with Rewa | Obtain secure bank payment authorisation and confirm bank eligibility |
| Recurring collection | Supported; confirm setup with Rewa | Supported through automated debit; confirm support for the tenant’s bank |
| Tenant charges | Confirm any Rewa or card-provider fees | Confirm any Rewa or bank fees |
| Settlement timing | Confirm timing with Rewa | Paid directly to the landlord’s bank account; confirm timing with Rewa |
| Failed payments | Automated reminders and alerts | Automated reminders and dashboard alerts |
Complete Onboarding and Authorise Payments
Complete Rewa’s ID and business-authority checks during onboarding. Add the property, tenant details, amount in AED, instalment count and payment dates, ensuring they match the signed lease.
Obtain payment authorisation through the supported card or bank process. Check the amount, dates and scope before activation, and retain the authorisation confirmation. Once authorised, verify the first payment and set alerts.
Step 3: Activate and Monitor Payments
After authorisation, switch from setup to live monitoring. Activate the first scheduled collection on the agreed date.
Check the First Payment and Set Alerts
Track the payment in the dashboard from initiation to confirmation. Check the receiving account and make sure the first debit matches the agreed amount and date. Confirm Rewa’s reminder timing and cut-off times, including how weekends and UAE public holidays affect settlement.
Reconcile Receipts and Handle Failed Payments
Once the first debit clears, match receipts against bank statements and the rent ledger. Mark rent as settled only when funds reach the account, not when collection is authorised. Keep amounts, dates and timestamps in a consistent format so records are easy to check.
Assign one person to handle failed payments, disputes and outages. Check the payment status before retrying to avoid duplicate charges. If the dashboard is unavailable, check bank records and contact Rewa before requesting another payment. Tell the tenant the payment status and what action you’ve taken.
Update or Cancel Payment Authorisations
Update the authorisation when lease terms, rent, payment dates, tenants or bank accounts change. To cancel, confirm the cancellation date, pending payments and cut-off times with Rewa and the tenant. Keep the cancellation confirmation, payment trail and receipts. Settle any outstanding balance separately.
Conclusion: Review Each Rent Cycle
At the end of each rent cycle, check both the payment and the process. Use a one-page rent-cycle checklist to cover compliance, authorisation, notices and close-out.
Track Rewa’s performance through on-time payments, reconciliation time and tenant feedback. Test these measures on a small portfolio before rolling them out across more properties. Repeat the same review after every cycle to keep the system accurate.
FAQs
Do I need to update Ejari to use Rewa?
No, you don’t need to update your Ejari registration to use Rewa. You only need to link your existing Ejari contract to confirm your rent amount and payment schedule.
During onboarding, Rewa checks your tenancy details using your Ejari certificate. This process follows Dubai Land Department and Ejari requirements, keeping your digital payment records compliant with UAE regulations as you switch from cheques to automated payments.
What does Rewa’s on-time settlement guarantee cover?
Rewa’s on-time settlement guarantee means landlords receive the full agreed rent directly into their bank accounts on the due date, in line with their payment arrangement. Automated collection removes the need for manual follow-up and avoids cheque payment risks, such as delays or partial payments.
Landlords pay no setup fees or collection charges. The rent amount agreed in their contract reaches their account without deductions.
What happens if a tenant cancels payment authorisation?
Under the UAE Central Bank’s Direct Debit System, tenants can cancel their payment authorisation at their discretion. This stops automatic rent collection from their bank account or credit card.
If payments stop, landlords should contact the tenant directly, send payment reminders or arrange another way to collect the rent. These steps help recover rent promptly and avoid delays.